
Facial simulation software for clinics and med spas
Face Studio turns one front-facing photo into an illustrative appearance preview during the consultation. Fifteen facial areas are adjusted independently and shown against the untouched original, so the client can see exactly which area you are describing. This page explains what it does, how a consultation runs with it, and — just as importantly — what it deliberately does not claim.
- Independently adjustable facial areas
- 15Independently adjustable facial areas
- Front-facing photo — no hardware or scanner
- 1Front-facing photo — no hardware or scanner
- Comparison views, plus selected-area zoom
- 4Comparison views, plus selected-area zoom
- Photos required to leave the device to render
- 0Photos required to leave the device to render
Who this is for
Aesthetic clinics, medical spas, skin clinics and salons whose sale begins with a face-to-face consultation about lines, contour or skin quality.
You do not need a 3D imaging booth, a developer or any hardware beyond the tablet, phone or laptop your team already uses. A single well-lit front-facing photo is enough.
What facial simulation actually is
Facial simulation shows a client an adjusted version of their own photo so a conversation about an area of the face becomes visual instead of verbal. In Face Studio, the face is mapped on the device, then a deterministic 2D shape-and-tone edit is applied to whichever areas you select.
That is the whole mechanism, and stating it plainly matters: there is no generative model inventing a future face, and no clinical model estimating how any treatment would behave on this person. Visual strength describes how strong the illustration is, not a dose, a product volume or an expected change.
The sentence to use with clients
"This is an illustration of the area we are discussing on your own photo — not a prediction of your result." Said once at the start, it keeps the tool useful and your consent paperwork honest.
The 15 adjustable areas
Each area carries its own visual strength slider with Subtle, Defined and Strong presets, and quick starts group the common combinations — upper-face lines, the eye area, and facial contour.
Swipe the table sideways to see all columns
| Region | Areas | Typical consultation topic |
|---|---|---|
| Upper face | Forehead lines, frown / brow lines, eyebrows | Line softening and brow position |
| Eyes & nose | Crow's feet, under eyes / tear troughs, bunny lines, nose | Periorbital appearance and shadowing |
| Mid & lower face | Cheeks, nasolabial folds, lips, marionette lines | Volume distribution and perioral lines |
| Chin, jaw & neck | Chin shape, dimpled chin, jawline / lower face, neck lines | Lower-face definition and neck appearance |
How a consultation runs with it
Capture consent, then the photo
A consent step precedes any client photo. Take one relaxed, front-facing photo in even light; the tool reports whether framing, alignment, exposure, detail and expression are usable before you continue.
Select one area at a time
Pick the area the client raised. Adjust that area alone first — a single change is far more persuasive, and far easier to explain, than fifteen at once.
Compare against the original
Use the divider or side-by-side view, and hold to see the original at any moment. Zoom to the selected area so the client is looking at the same region you are describing.
Talk about the area, not the outcome
Map what the client is looking at to the treatments you actually offer, and set expectations verbally. The illustration opens the conversation; your clinical judgement leads it.
Reset or export
Reset a single area or clear everything to start again. Export a labelled PNG containing the original and the illustration side by side for the consultation record.
Where it fits with the AI facial scan
The 12-metric AI facial skin analysis answers "what is the current state of this skin?" with scored metrics your team can track scan over scan. Facial simulation answers a different question: "which area are we talking about?"
Used together, the scan gives the objective starting point and the follow-up record, while the simulation makes the target area unmistakable in the room.
Swipe the table sideways to see all columns
| AI facial skin analysis | Facial simulation | |
|---|---|---|
| Question it answers | Current skin condition, scored | Which facial area is under discussion |
| Output | 12 metrics, explanations, visual panels | Illustrative adjusted photo, comparison views, labelled export |
| Tracking over time | Yes — scan history and progress charts | No — per-session illustration |
| Predicts a treatment result | No | No |
| Availability | Every seat | Paid Enterprise seats |
Photo quality and honest limits
- One face, framed front-on, with a relaxed expression and even lighting
- Strong side lighting, heavy makeup, glasses or hair over the face reduce mapping quality
- Profile shots, extreme angles and very low-resolution images are rejected rather than guessed at
- A 2D shape edit cannot represent muscle response, bone structure or injectable volumes
- Not a diagnosis and not a medical device function — anything clinically concerning belongs with a qualified clinician
Consent, privacy and compliance
Face mapping and rendering happen on the device during the session, and the original pixels remain the source for every render, so nothing is re-derived from a previous edit.
Because a simulated face is easy to misread, every on-screen view and every export is permanently labelled as a simulation. Keep the exported PNG with the consultation notes and avoid publishing simulated images as before-and-after marketing — in most markets, advertising rules treat a simulated image shown as an outcome as misleading.
What it looks like
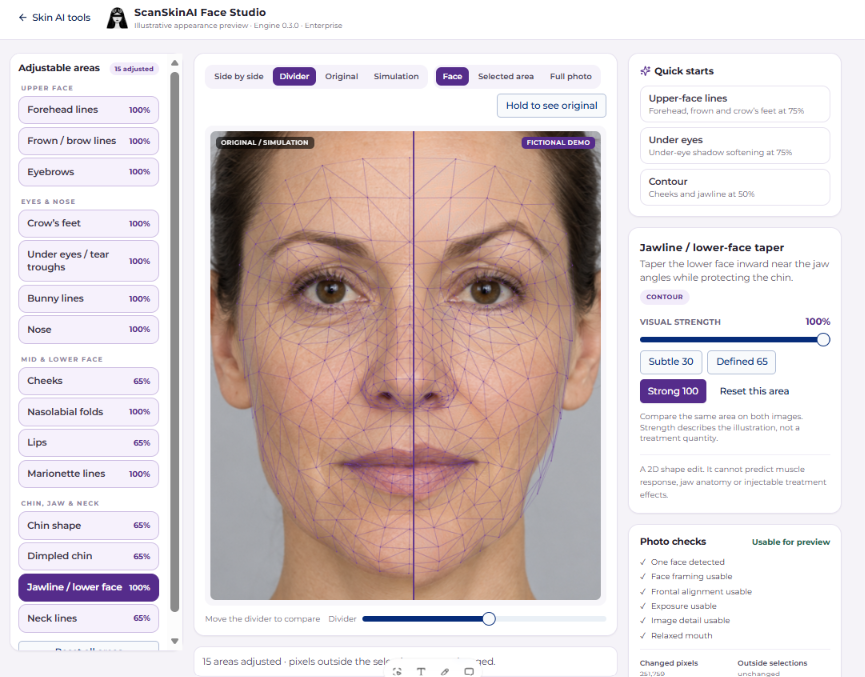
The screenshot below shows Face Studio in divider view on the fictional demo portrait supplied with the tool: adjustable areas on the left, comparison and zoom controls above the image, and per-area visual strength on the right.
Getting access
Take an Enterprise seat
Facial simulation unlocks on paid Enterprise seats — the same seats that give each logged-in operator unlimited facial scans under fair use.
Open it under Skin AI tools
It appears in the Skin AI tools area next to the facial scan, UV skin type and wound tools, and is locked with an explanatory screen on non-Enterprise accounts.
Brief the team once
Agree the one-sentence framing, which areas you will illustrate for each treatment you sell, and where exported PNGs are filed.
Frequently asked questions
Related business support
Medical spa lead generation
How a med spa turns walk-ins, social traffic and website visitors into booked consultations using AI facial skin analysis.
Hosted scan page for clinics
Your own branded scan page — launch in a day, share by link, QR code, poster or one-time invite, and budget scans by campaign.
Embed the scan on your website
Drop the scan into WordPress, Squarespace, Wix, Shopify or any site with one script tag. Clients never leave your domain.
Send leads to your CRM
Consent-based lead routing to GoHighLevel or Zapier, with the scan summary attached as a note on the contact.
Show clients the area, not a price list
Facial simulation and the 12-metric facial scan both come with an Enterprise seat. The medical spa page covers seat pricing and what your clients see.