Employer & Business Onboarding Guide
Two clear paths. Whether you're rolling ScanSkinAI out to your workforce or publishing your products into the AI facial-scan recommendations, follow the step-by-step flow below — most teams are live in under an hour.
Who is this guide for?
Pick the path that matches your role — both are self-serve and online-only.
Employer (1–99+ seats)
Buy seats for your workforce so employees can run AI skin and facial scans on their own phones.
Business (spa, clinic, retail)
Publish your products or services so they're recommended after each facial scan — replacing the default Boots / Superdrug picks.
Employer onboarding
Get your workforce scanning in under 5 minutes.
- 1
Register a free account
Create your free ScanSkinAI account in under a minute — no credit card required to start.
- 2
Choose the Enterprise Plan & seats
Select the Enterprise Plan, enter the number of users (employees), and complete checkout securely online.
- 3
Open your Profile page
On mobile, tap Account. On desktop, click the account icon in the top-right corner.
- 4
Fill in your Company tab
Scroll to the Company tab and add company name, address, and telephone number.
- 5
Generate an invite code or link
Create an employee invitation code or shareable link from the Team Seats panel.
- 6
Send invites to your team
Email or message the invitation link to your employees.
- 7
Employees join your workspace
Each employee uses the link to register and is automatically connected to the company owner's account.
Please note: the Company Wallet feature is not currently available.
Business onboarding & product catalog
Publish your products or services so they power AI facial-scan recommendations.
- 1
Register and choose the Enterprise Plan
Same as employer onboarding — register, pick the Enterprise Plan, enter the number of users, and complete checkout.
- 2
Set up your Company profile
From Profile → Company tab, add company name, address, and telephone number.
- 3
Invite sub-accounts (your staff)
Generate an invitation code or link and use it to create or connect your team's sub-accounts.
- 4
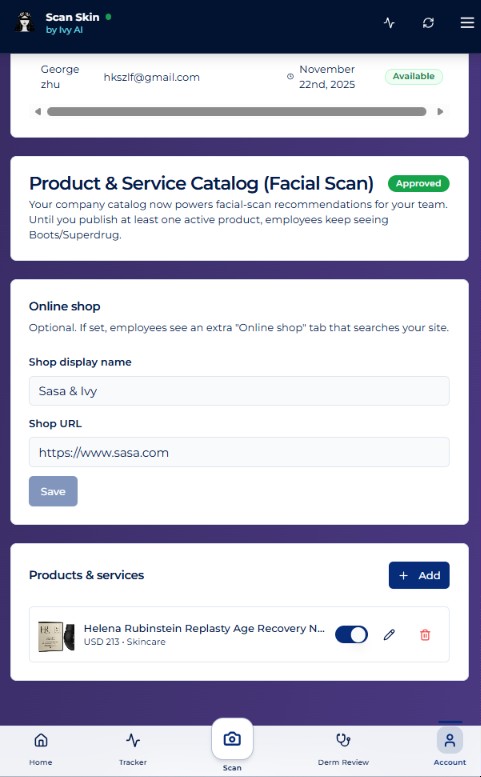
Open the Product & Service Catalogue section
From the company owner account, scroll to the Company tab and find the Product & Service Catalogue panel.
- 5
Submit your business application
Add a short business introduction, your website, and any other relevant details. Submit for approval — once approved, you can start adding products or services.
- 6
Connect your online shop (optional)
If you sell online, add your Shop display name and Shop URL — employees will see an extra 'Online shop' tab that searches your site. No online shop? Add products and services manually.
- 7
Add products or services
For each item, enter name, description, price, currency, category, optional product URL, and an image — then click Save.
- 8
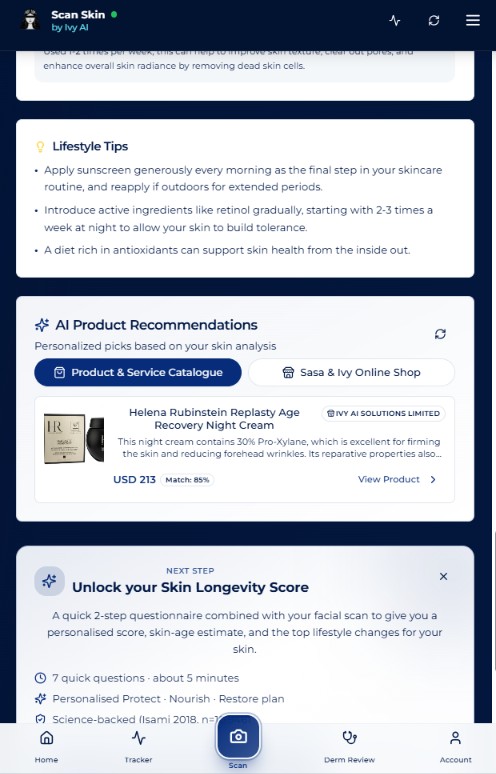
Run a facial scan to power recommendations
Open the ScanSkinAI facial scan. When the result loads, scroll down to the AI Product Recommendations section.
- 9
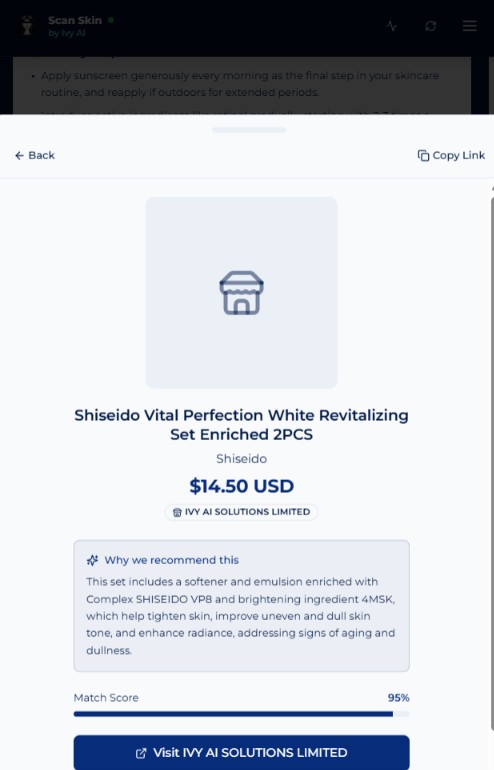
See your catalog drive AI picks
Depending on your setup, you'll see two tabs: Product & Service Catalogue, and Online Shop. The system recommends suitable items from your database based on the user's facial scan results.
What each product needs
- Product or service name
- Description
- Price
- Currency
- Category
- Product URL (optional)
- Product or service image
- Active toggle
Please note: the Company Wallet feature is not currently available.
Frequently asked questions
Who is this onboarding guide for?
Two audiences. Employers buying seats so their workforce can run AI skin and facial scans, and businesses (spas, clinics, beauty retailers, pharmacies) that want their products or services recommended to users after a facial scan.
How long does setup take?
Employer setup takes roughly 5 minutes end-to-end. Business catalog onboarding takes longer because each product needs an image, price and category — most teams publish their first 5–10 SKUs in under an hour.
Do my employees need to install anything?
No. ScanSkinAI runs in the browser and on iOS. Employees register from the invitation link you send and start scanning immediately.
What if I don't have an online shop?
You can still publish a catalog — just add products and services manually with name, price, image, and description. Employees and end-users will see your items in the AI Product Recommendations panel.
When do my products start appearing in AI recommendations?
As soon as you publish at least one active product, your catalog replaces the default Boots/Superdrug recommendations for your team.
Is the Company Wallet feature available?
Not yet — the Company Wallet feature is on the roadmap but is not currently available.
Where to go next
Small Business Skin Checks
1–99 seats, self-serve. Outdoor crews, clinics, agencies — early skin cancer flagging built in.
View plansFacial Scan for Spas & Clinics
AI facial analysis paired with your branded product or service catalog — designed for aesthetic businesses.
See spa solutionEnterprise & Partner Solutions
100+ seats, white-label, or API integration? Talk to our team for custom pricing and SLA.
Business solutions